Light, buttery sugar cookies decorated for springtime.
For full recipe see below!

Today I’m going to share one of my favorite recipes… sugar cookies! This recipe was my grandma’s and was actually one of my first baking experiences! My grandma visited for Christmas when I was 2 years old, and she made sugar cookies with me, my sister, and my brother. Bless her soul for taking on that project with 3 little kids!
 From left to right: Kelly, Me, Grandma, Corey
My sister and I still make them every year at Christmas to leave out for Santa!
I know it’s not Christmas, but I had Easter cookie cutters and a day to spend baking…what else was I to do but make sugar cookies? And look how cute they are…my favorites are the carrots, but I also made bunnies, chicks, and Easter eggs!
These sugar cookies are actually my favorite cookies! They are so soft, and they just melt in your mouth with all their buttery-ness! They are also a great activity to make with kids as my grandma proved….I mean she, along with my other grandma and mother, got me into baking!
 So to start, gather your ingredients (picture 1). In a small bowl, mix flour, baking powder, and salt together. The flour can but doesn’t need to be sifted; the spoon and level method will work just fine. See this post to brush up on measuring flour. In a separate bowl, cream the softened butter until there are no lumps (picture 2). Now add the granulated sugar and beat until combined completely with the butter (picture 3). Add the egg yolks and vanilla and beat again (picture 4). Now add the flour mixture and milk alternating and beginning and ending with flour mixture (picture 5). Be sure to scrape down the sides of the bowl after each step. Form the dough into a disk and wrap it up in plastic wrap and refrigerate for at least an hour (picture 6 and 7).
Ugh I know….chill time…I don’t know about you, but I don’t think chill time is as “cool” as it sounds! I’m sorry for the horrible pun… but seriously chill time is one of few things I hate about baking…that and washing dishes! So take my hatred of chill time as a testimony to how completely buttery and soft these cookies are!

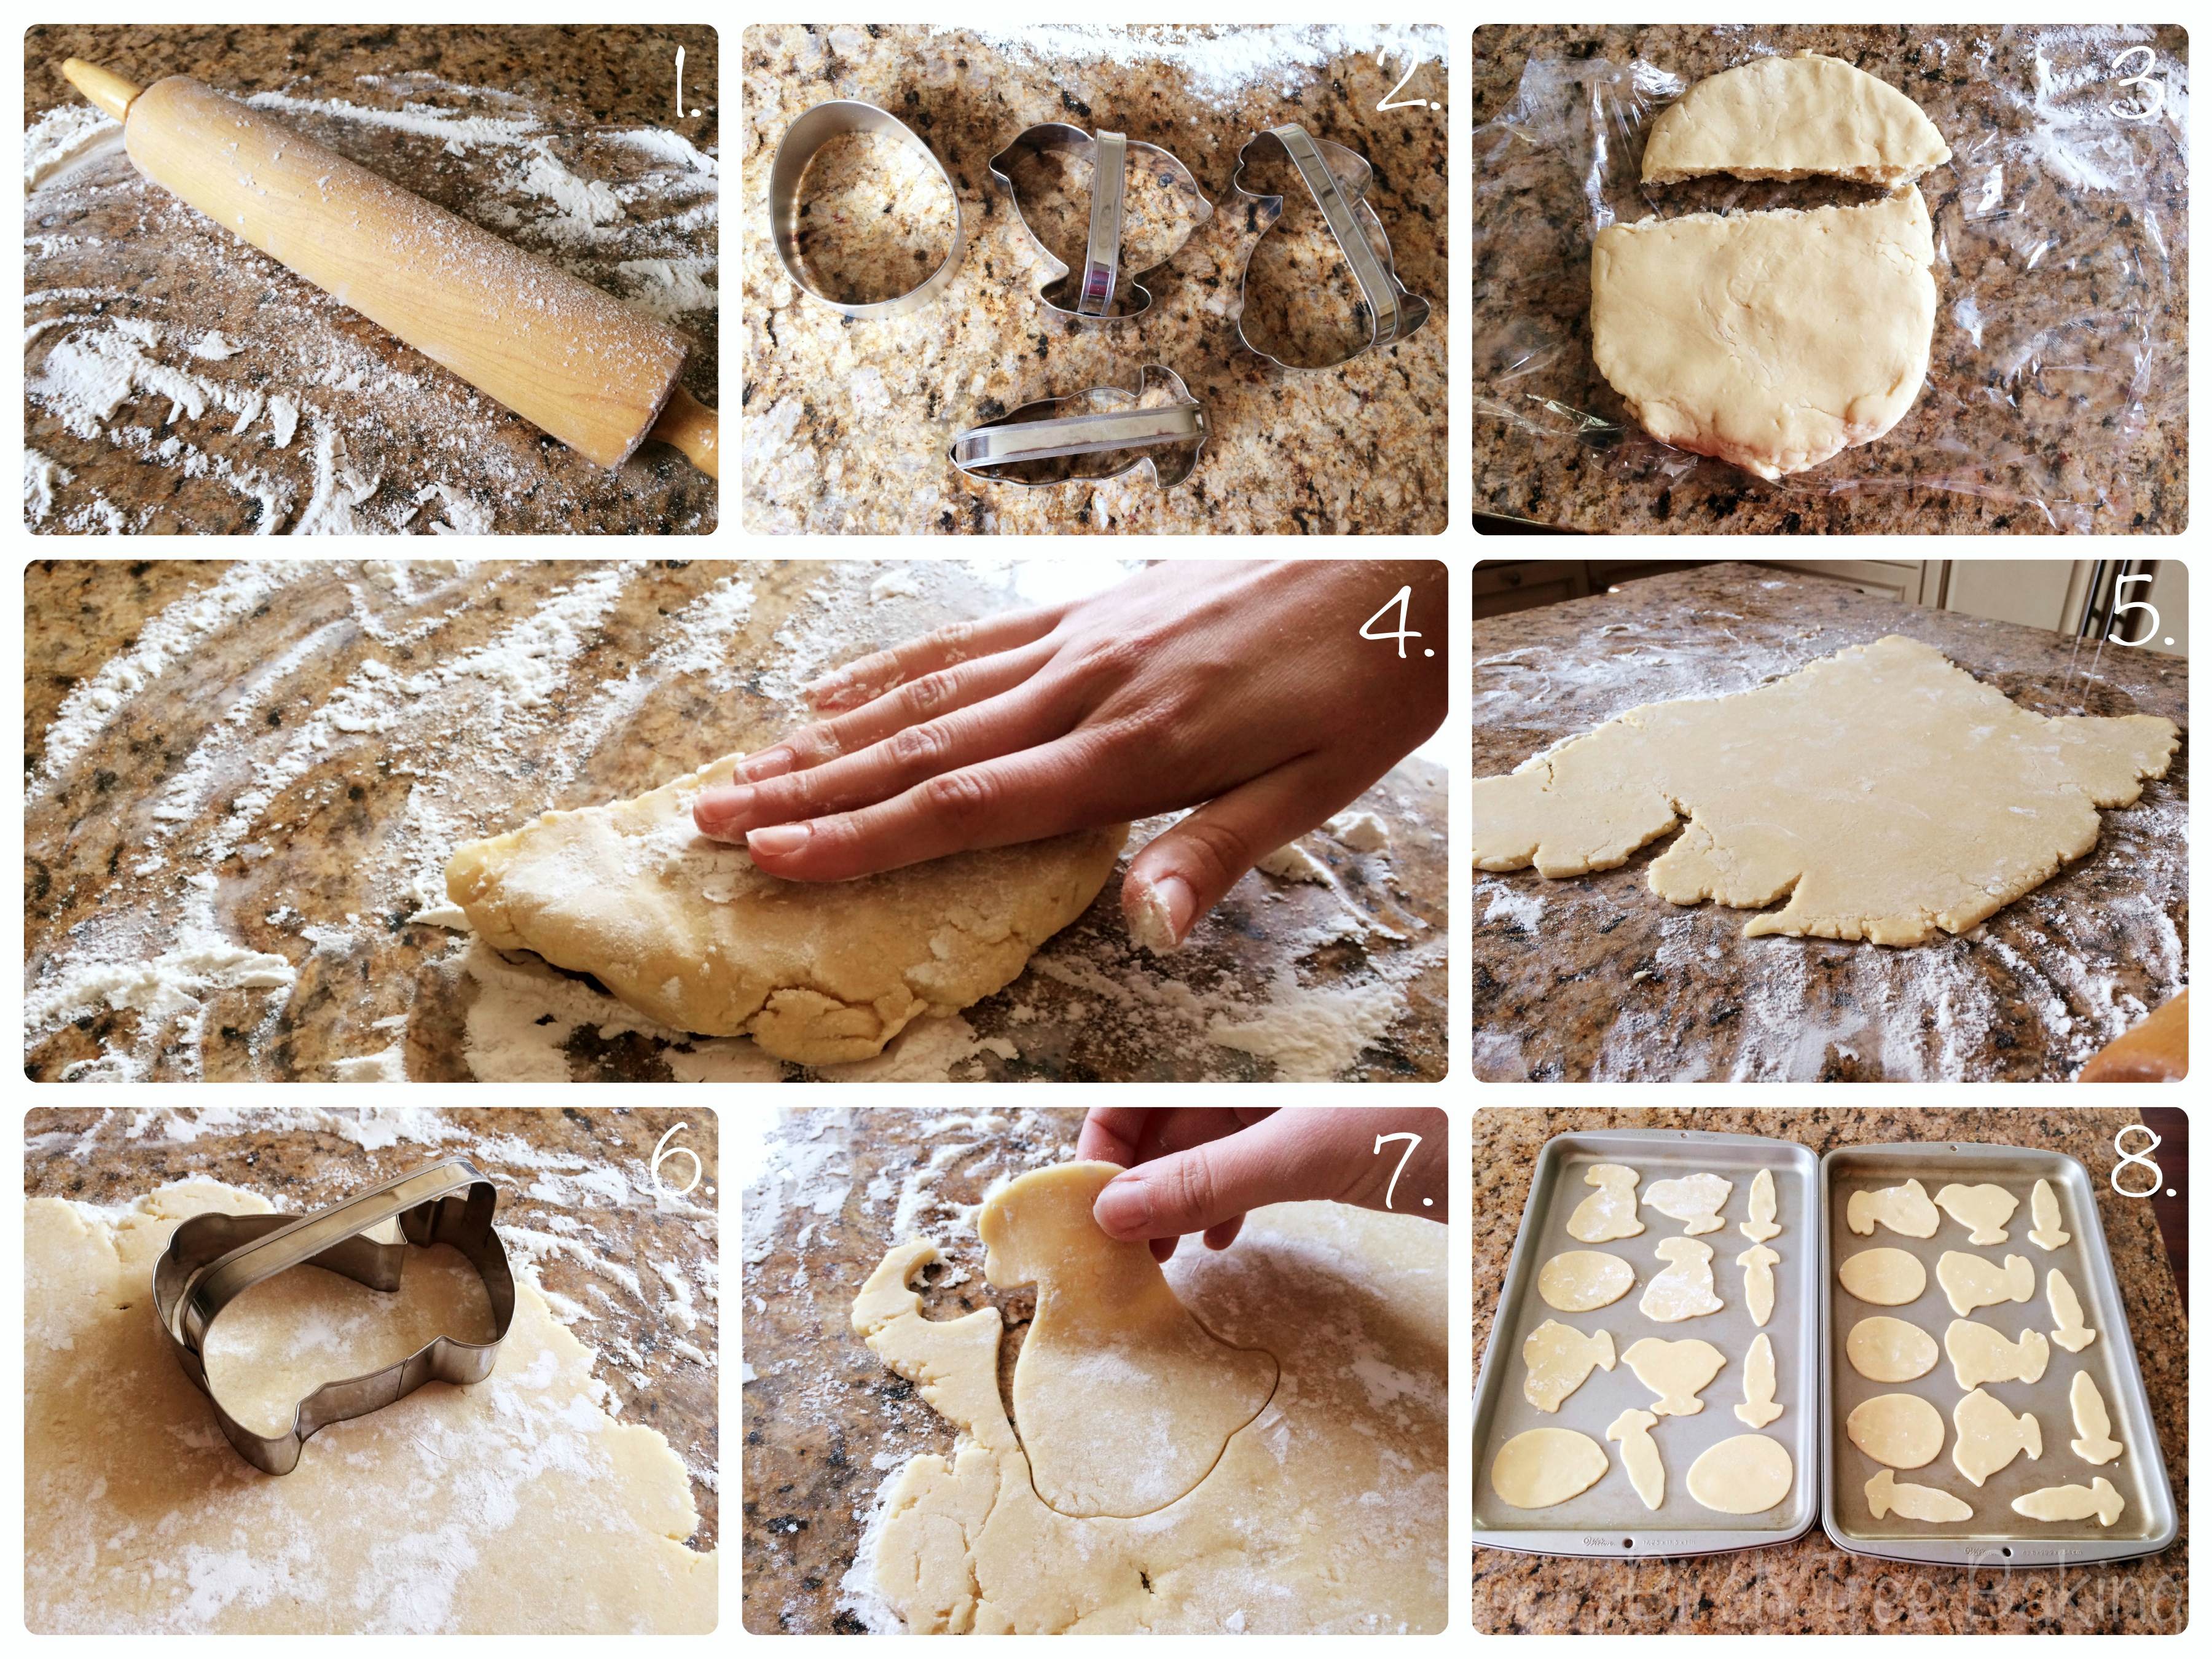
Remove the dough from the fridge after at least an hour. Flour a clean, dry surface and a rolling pin very well (picture 1). Do not fret about over flouring; this recipe is hard to get too much flour in! Grab your cookie cutters and dip them in a little flour so they don’t stick (picture 2). I like to work with a little of the dough at a time, so I recommend breaking the disk into 2 or 3 chunks. Rub some flour on both sides of the dough to keep the rolling pin from sticking to the dough (picture 4). Now start to roll out your dough. If you left the dough in the fridge for an hour, it will probably warm up and roll out pretty easily. If you left the dough in the fridge for 12 hours, you might have to let the dough sit out for a few minutes. While you’re rolling out the dough, check that it is not sticking to the counter by lifting it up. If it is starting to stick throw some more flour under it! Don’t worry about the shape it comes out in…mine looks like a combination of China and France (picture 5)! Roll the dough out to 1/8- 1/4 inch thick; the thicker they are the softer they’ll be. Now cut out shapes and gently lift them up so that they don’t tear or become distorted (picture 6 and 7). Place the cookies on a grease cookie sheet (picture 8). It doesn’t matter that they are close on the cookie sheet because they do not spread during baking; just make sure they aren’t touching!
 When you have used as much dough as you can out of the rolling out, gather the scraps into a ball and roll them out again.
Cookies vs Pie. Cookie dough is not like pie dough in that you can roll it and handle it more. Pie crust has layers of butter pockets, and by working that dough you are getting rid of the flaky texture. Therefore, pie you get one shot to roll it out and pray that you can get it into a circular like shape! Sugar Cookies shouldn’t be flaky, and they don’t have layers of butter pockets, so you’re good to go! If you handle it way too much it will start to get stiff and the cookies won’t be as good but that takes a lot of handling. Also sometimes the dough doesn’t roll out nicely the first time (cracks, sticking to the counter), but don’t worry just gather it into a ball and roll it out again.

You have a couple of options for decorating:
1. Sprinkles- put on before baking, less time consuming, I like the taste better
2. Icing- used after baking, more time consuming, really impressive, great presentation

So if you’re using sprinkles, put them on now. Bake for 6-9 minutes at 350°F. I like mine softer, so I take them out at 6 minutes. If you like sugar cookies crispier, pull them out when they are lightly brown on the bottom.
Let the cookies cool on the pan for 1-2 minutes and then carefully move to a wire rack.
Once the cookies are cool, you can ice them. To brush up on your icing skills, refer to this post.
If you ice your cookies, wait to wrap the cookies up until the icing is completely dry or else it smears everywhere!
…and voilà!

- 3 cups all-purpose flour (spoon and level method)
- 1 teaspoon baking powder
- ½ teaspoon salt
- 1 cup salted butter, softened
- 1 cup granulated sugar
- 2 egg yolks
- 1 teaspoon vanilla
- ⅓ cup milk
- 2 cups powdered sugar
- 2½ Tablespoons water
- food coloring
- Mix flour, baking powder, and salt in a small bowl.
- In a separate bowl, cream the butter until it is smooth.
- Add sugar gradually.
- Mix in egg yolks and vanilla and blend well.
- Add dry ingredients gradually to wet ingredients alternating with the milk, beginning and ending with the flour mixture.
- Form dough into a disk and wrap in plastic wrap.
- Chill for at least 1 hour in refrigerator or until firm.
- Preheat oven to 350°F degrees.
- Flour a clean, dry surface and a rolling pin very well.
- Break the disk into 2 or 3 chunks so that it all doesn't get warm at the same time. This way you can stick some back in the fridge and pull out a cold piece.
- Roll dough out on a well floured surface to ⅛-1/4 inch thickness.
- If it sticks the first time or when you have scraps, form it into a ball and roll it out again.
- Cut with cookie cutters and place on greased cookie sheets.
- Decorate before baking with colored sugars and sprinkles or ice after baking.
- Bake for 6-9 minutes.
- Cool on the pan for 1-2 minutes and then carefully remove them to a wire rack.
- Whisk powdered sugar and water together until smooth.
- Add food coloring.
- Ice the cookies. See pictures in the linked post for details and tips.
- Voilà!
This recipe has never failed through at least two generations and it is so sweet to see the picture of all three of you so young in the kitchen with your grandmother. Your illustrations and artistic decorations are fantastic!
Thanks Mom!
Love your blog!
Thanks! I’m glad you like it!